Here we are – this is it! Drumroll please 🥁…the post where I debut a framework to make a ladder guide for any role in the tech industry! But when I say “I,” I don’t mean just mean myself. I want to introduce and heap praise upon my former coworker and now coauthor of this post, Bryan Zug. It is only thanks to him that we have this open source framework that you are free to use! And yes, after this post, I will use this framework to make a publicly available TPM ladder guide, completely free to use (and modify as you see fit). To my knowledge, this will be the first of its kind, but please share any existing examples you know of!
If you’re confused about what I am talking about, or thinking “what is a ladder guide?” check out my last post ![]() So, You Want to Make a Ladder Guide? Part 1: The Process and then come back here.
So, You Want to Make a Ladder Guide? Part 1: The Process and then come back here.

Now that you’re back, you know to expect two parts to a ladder guide:
- A narrative “cover letter” to introduce the role and be used for recruiting and cross-role understanding. See the template
 here.
here. - A matrix to be used for individual role clarity and promotion use cases. See the template
 here.
here.
Narrative Cover Letter Instructions
I am starting with the instructions for this part of the ladder guide first for a reason, as explained in my last post:
I recommend you start with the narrative component. The narrative component is easiest to review to ensure you are thinking about the role correctly. This is especially important if your leadership is reviewing the guide and/or you are introducing a new role to your company.
If you open up ![]() the template, you’ll see that there are two main sections that together should be ~2 pages or less.
the template, you’ll see that there are two main sections that together should be ~2 pages or less.
Step 1: Role Description
The Role Description introduces the role in a level-agnostic manner. What is the elevator pitch for the role? I know first hand how challenging this section is to write, so spend the time to get this section just right. A picture is worth 1,000 words, so I strongly encourage the use of an infographic here to concisely get your point across. For example, expect to see ![]() the TPM triangle here when I use this framework to produce a TPM ladder guide.
the TPM triangle here when I use this framework to produce a TPM ladder guide.
Step 2: Career Progression Summary
In writing your Role Description, it should be clear what levels make sense for the role. Again, from my last post:
Just because levels exist at a company doesn’t mean every role needs to support individuals at that level.
The Career Progression Summary will clearly lay out what levels will exist for the role. For example, should the role include an “associate” level (the most junior level possible)? This is a debate within the TPM community, and you’ll see my opinion when I produce that guide next.1
Additionally, the Career Progression Summary also gives you a place to explain significant shifts in the role at a particular level. For example, this is relevant for engineering roles at the Staff/Principal level.
Once you have this ~2 page doc written, you have an excellent, low-cost artifact to review within your company as needed to ensure there is high-level alignment with the role’s existence and definition. This is valuable to do before you continue with the more in-depth (and higher effort) work producing the matrix component of the ladder guide!
Matrix Instructions
With the narrative out of the way, it’s time to focus on the “meat” of the ladder: what does this role mean at each level? If you open up ![]() the template, you might feel overwhelmed at first – I know I did! But fear not; to walk you through this process, Bryan (who often goes by “Zug”) made an awesome video tutorial walking through
the template, you might feel overwhelmed at first – I know I did! But fear not; to walk you through this process, Bryan (who often goes by “Zug”) made an awesome video tutorial walking through ![]() an example for the Product Designer role with levels matching the Google model:
an example for the Product Designer role with levels matching the Google model:
If you watch the video, you’ll hear Bryan talk about a host of names given to these types of artifacts. This comes in part due to his learning from Peter Merholz, who prefers the word “trellis” to “ladder.” Admittedly, I have not given such semantic thought to this area – I only use the word “ladder” because that is the common terminology used in this space. Regardless of the word used, I believe ![]() my past post demonstrates my alignment with Peter’s beliefs:
my past post demonstrates my alignment with Peter’s beliefs:
…the software engineering role has a significant shift at the Staff level based off the Staff Engineer book…
The point is, these ladder guides don’t require skills to grow at every level; changes, or “shifts” at a particular level are supported; how will be made clear later in this post.
With that out of the way, let me now provide a narrative version of the instructions on how to use ![]() this template.
this template.
Step 1: Make Your Own Copy of the Template
This is as simple as it sounds – make your own copy so you have full edit access (and don’t screw things up for others)! Name it was you want, fill in the “Role_Name,” shrinking the text as needed to fit it in the cell, and update the “corresponding cover letter” link on the “Worksheet” tab:

Also head over to the “Credits” sheet and give yourself credit for the work you’re about to do 💪:

Step 2: Configure Your Defined Levels
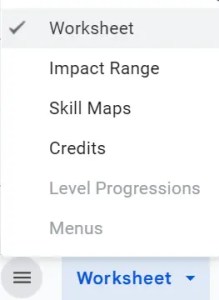
Do this by going to the hidden “Menus” sheet – just click the “hamburger” on the lower left of your screen, navigate to “Menus,” and click (even though it’s greyed out). You should now see “Menus” as a tab on the bottom sidebar.

Now, you can edit the values in column A, “Level,” to match your needs. Once you’ve done this, right click on the Menus tab and select “Hide Sheet” to make it hidden again.
If you go back to “Worksheet,” you should see the Data Validation range for the “Current Level” dropdown in Cell R3 automatically update to match the levels you just set in the “Menus” sheet. If you made the max level lower than L8, you will need to update the formula in column M to take the new max level into account:

Simply replace the max level that $D$5 is checking for, and update the text to display when the max level is selected. Be sure to do this for all skill rows, as well as the impact range row (where the formula looks slightly different, but the instructions are the same).
Step 3: Define Your Impact Range
The “impact range” is essentially a more detailed version of the Career Progression Summary from the narrative template that you have already done. It is a table that breaks out Direction, Scope, and Context across each level of the role to see how it progresses. Bryan described it as “the how of how you work, and how it changes over time.” Typically, this tells the story arc of a career, starting with junior levels that need more hands-on direction while working on smaller scope items, to more senior levels where folk are self-directed or directing others while working on larger scope items with more ambiguity.
You will notice in the template that clear differentiation of Impact Range can be tricky to define the more levels you have. Conversely, jumps may be too significant without enough levels. This is a good litmus test to see if you defined the right number of levels in the earlier step!
It is reasonable to copy the Impact Range table and include it at the bottom of the Career Progression Summary in the narrative document. If you do this, be sure to link the gSheet so the document automatically stays in sync with the table! Note that this is not expected as a part of any initial reviews of the narrative template. Rather, it connects the two artifacts before they are published more broadly together.
Formatting note: be sure to leave two blank lines at the bottom of every cell where “Direction” and “Scope” are defined. This will ensure the best formatting in the “Worksheet.”
Step 4: Define Your Skills
Next, you need to define the actual skills in the “Skill Maps” sheet that are expected in the job broken into three categories:
- Craft Skills: skills specific to the discipline or role. In Bryan’s example, these are skills specific to the product designer role.
- Strategy Skills: strategy is such a popular skill across roles that it warrants its own section. While strategy work is a common expectation across roles, specifics can vary across roles. Hence, these skills are sometimes shared across roles, but they are not expected to be shared across every role. For more details on defining strategy, see
 Let’s Talk Strategy: What it is and Why it Matters.
 - Professional Skills: skills that are shared by every discipline or role. Common examples are communication & collaboration, mentorship & interviewing, etc.
Optionally, feel free to add 1-2 sentences in italics underneath the bolded skill name if you want a short definition of the skill.
You will then define each skill from Aware → Developing → Intermediate → Advanced → Expert. However, you may wish to continue to step 5 before coming back here for each skill definition, as you may not need to define all skills through all five stages. If you aren’t using the full breadth of a skill, perhaps due to shortening the number of levels, you can grey a cell out and fill out “N/A” instead of creating unused text.
But wait – Google has eight levels, and this only has five stages in the progression of a skill. How can there be eight levels?! Because not every skill has to advance with every level increase! Ie, think of this more like a trellis than an individual ladder per skill. For example, perhaps an engineer is expected to be an Expert at coding at the Staff level. From there, growth is expected in other areas, such as Strategy skills!
Note that bullets give you flexibility in how you write each skill – include all detail necessary. However, do not think it is required that as you progress in a skill, the bullet list must get longer. Additionally, if you want to carry over the same text from one cell to the next, it help to clearly label that the text hasn’t changed from the previous one; lead such bullet points with “(Same)” to clearly mark when this happens. Formatting note: Be sure you keep the bullets in the same order to maximize usability of your guide in the Worksheet tab.
Here is an example from the Product Designer’s Strategy Skills, where the Expert list is shorter than the Advanced list:

Formatting note: be sure to start and end each skill name cell (column B) with a newline character (cntrl + enter x2). These two newlines are used as indicators for proper text snapshotting in the formulas on the “Worksheet” and “Level Progression” sheets in columns B and A, respectively. This formula ensures a perfect semantic copy of the skill name in these tabs while leaving off any supplemental definition text added below the name.
Once you have completed this exercise, go back to the “Worksheet” and ensure that the skills defined there are in sync with the skills defined in the “Skill Maps” sheet. Make adjustments to sync the two if necessary, noticing that the skill title should auto-populate based on the formula in column B:

If the skills are not auto-populated (perhaps because you made more than the template), then you can copy this formula as needed and simply adjust the “Skill Maps” reference as needed. This formula grabs the skill title but cuts off any skill description included.
Additionally, you may need to resync the links in Column I of “Skill Maps” to the proper rows in “Worksheet” and the reverse link in Column O of “Worksheet” to “Skill Maps.” Simply click on the link, edit it, and then “Select a range of cells to link.” You can then navigate to the correct rows in the sheet you want to link to and have the link navigate the user to the correct location.

I also noticed that the formatting would change for reasons I cannot explain. Specifically, the text size would change from the default of 8 to 10 at times, and the underline would sometimes go away. I don’t think it matters much what formatting you choose, but go through and make the formatting consistent.2
Last but not least, references to “Worksheet” cells in columns I, J, & L of the “Skills Map” sheet can get out of sync. This should be an easy one to fix to ensure that selections in “Worksheet” correctly populate on the “Skills Map” sheet. I had to also reset the vertical alignment for updated cells to be centered again (don’t ask me why 🤷♂️).
I recognize that these formatting flaws can be a bit tedious, but I am spelling them out here so that you don’t waste time debugging them (like I had to when dogfooding this process 😉).
Step 5: Define the Level Progression
Like you did in Step 2, unhide the “Level Progressions” sheet and navigate to it. Modify the columns to match your levels defined in Step 1 and fill in your Skills from Step 4 in Column A. Then, depending on changes you made to “Skill Maps” in the previous step, you may need to reorganize the rows to rematch the skill structure.
Next, fill in the expectations at each level as Aware, Developing, Intermediate, Advanced, or Expert. The color coding updates automatically through conditional formatting to easily visualize the progression across levels.
Here is the Product Designer example:

Step 6: Manual Formula Updates Based on Changes
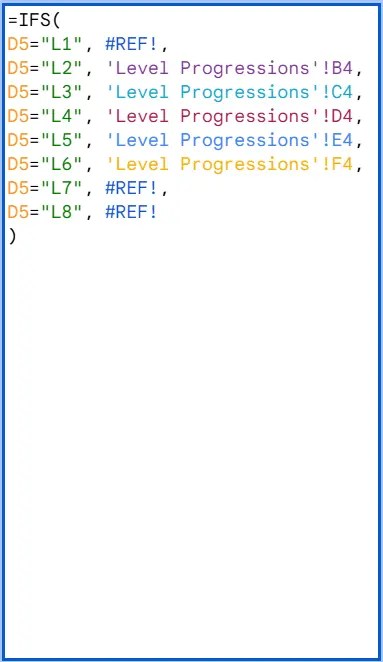
Once all of the above steps are done, if you made any changes to the number of levels in step 2, you must make changes to some formulas in the “Worksheet” to take this into account. First, unhide columns C-E. In column C, you should see a formula like this in skill rows:

If you kept all levels back in step 2, you should not see “#REF!” at all in this formula. However, you should only be reading this if you did 😉. You need to delete all rows with #REF in them, making sure you don’t end the formula with a trailing comma.
Additionally, you might notice that the cells are wrong for the skill this is supposed to be referencing. While the Columns (the letters) should be accurate, the Rows (the numbers) might not be. Be sure to update the formula to reference the right skill progression!
Reference “Level Progressions” directly as needed to double check your work, and be sure you update this formula for all of your skills! When you’re done, hide columns C-E again.
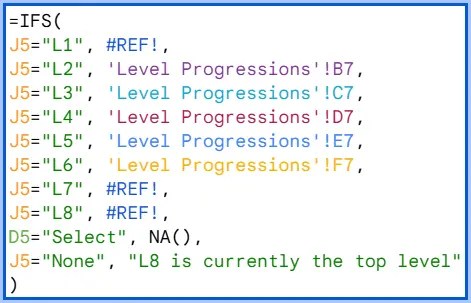
Next, unhide columns I-L. In column I, you should see a formula like this in the skill rows:

Again, if you kept all levels back in step 2, you should not see “#REF!” at all in this formula. Like above, you need to delete all rows with #REF in them. You also need to change the text in the final row to reference the top level if it is lower than L8.
Like above, you might notice that the cells are wrong for the skill this is supposed to be referencing. While the Columns (the letters) should be accurate, the Rows (the numbers) might not be. Be sure to update the formula to reference the right skill progression! The cells referenced should be the same as the update you made above for column C in the same row.
Be sure you update this formula for all of your skills. When you’re done, hide columns I-L again.
Conclusion
You now have all the materials you need to create your own ladder guide! All I ask is that you cite this post when using these resources. At the same time, I do not expect this process and its templates to be flawless. If you are using these and experience issues or have questions, please reach out so that I can make fixes and improvements for others! Post a comment here, reply to an automated post email, message me on LinkedIn, or use ![]() my contact page – you can’t say I’m heard to reach 🤣!
my contact page – you can’t say I’m heard to reach 🤣!


1 Comment
Leave your reply.